A Unified Auction Ecosystem

From First Listing to Final Delivery

Turn minutes into profits with one platform to catalog, manage, and ship your auction goods.

employee on tablet in warehouse

The Software

ScanPro by pkgPlace

Lister tutorial

Getting started

What you need:

  • Your login credentials (provided by your admin)
  • An Android or iPhone with Chrome or Safari
  • An active auction assigned by your admin


Install the app:
ScanPro runs in your phone’s browser — no app store download needed.

  1. Open Chrome (Android) or Safari (iPhone)
  2. Go to scanpro.pkgplace.com
  3. Log in with your email and password
  4. Tap the share icon → Add to Home Screen for quick access

Install the app: ScanPro runs in your phone’s browser — no app store download needed.

  1. Open Chrome (Android) or Safari (iPhone)
  2. Go to scanpro.pkgplace.com
  3. Log in with your email and password
  4. Tap the share icon → Add to Home Screen for quick access
  1. Open ScanPro and sign in with your email and password
  2. Tap the Auction tab at the bottom
  3. Tap the auction you are working in to set it as active
  4. The auction number appears in the top-right corner of every screen — this confirms which auction you’re cataloging into
  5. Tap the Catalog tab to begin

The green badge in the top right corner shows the active auction number. Before you can save any item, an auction must be selected.

  1. Tap the Catalog tab
  2. If no auction is selected, a yellow banner appears at the top — tap it to choose your auction
  3. Once selected, the green badge shows your auction number confirming you’re ready to catalog

The items

  1. Tap Scan Barcode
  2. Point your camera at the UPC barcode on the item
  3. Hold steady — it scans automatically
  4. If found, item details load instantly
  5. If not found, you’ll see “No results” — proceed to Option C or D
  1. Tap Google Lens
  2. An in-app camera opens — point it at the item
  3. Tap Capture
  4. Visual matches appear — tap the best one to use its title
  1. Type a UPC, ASIN, title, or paste an Amazon URL into the search bar
  2. Tap Go
  3. If the item is already in the catalog, it will appear — tap it to select it.

Enter item manually to fill in the title and details yourself.

When an admin imports a manifest, ScanPro creates draft lots — placeholder lots pre-populated with the manifest data (title, description, UPC, quantity, consignor, etc.). These drafts sit quietly in the background until a lister physically scans the matching item.

What the lister sees:

  1. Lister scans or searches for an item
  2. If the item matches a draft lot in the active auction, a result appears tagged “Draft lot #X” in amber
  3. Lister taps the result to select it — all manifest data pre-fills the form automatically
  4. A amber banner appears at the top of the Item Details screen:

    Draft lot matched — Lot #14 — will be updated, not duplicated

  5. Lister completes condition, photos, and label scan as normal
  6. On save, the draft lot is promoted to active — no duplicate lot is created

Lorem ipsum dolor sit amet, consectetur adipiscing elit. Ut elit tellus, luctus nec ullamcorper mattis, pulvinar dapibus leo.

The item details

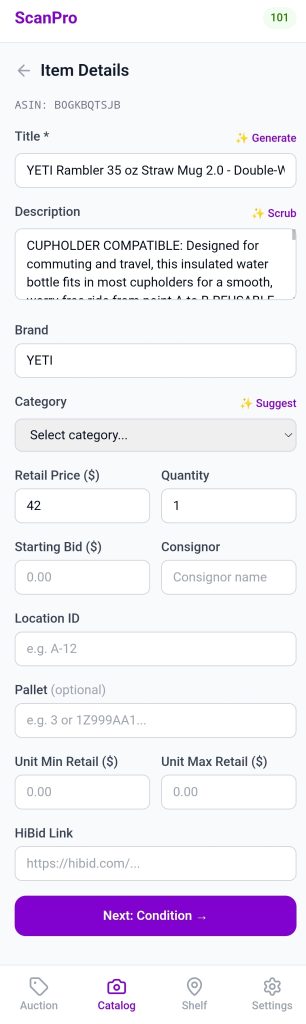
Once an item is selected or entered, complete the following:

  • Title — edit or tap ✨ Generate to clean it up using the product details
  • Description — usually pre-filled from the manifest or product lookup; tap ✨ Generate if it’s missing or needs expanding
  • Brand, Category, Retail Price — fill in what you know
  • Scroll down for lot fields:
    • Quantity — how many units in this lot
    • Condition — required (New, Like New, Good, Fair, etc.)
    • Consignor — who brought the item in (if applicable)
    • Location / Pallet — where the item is physically stored
    • Starting Bid — leave blank if set by admin
    • Notes — anything the buyer should know


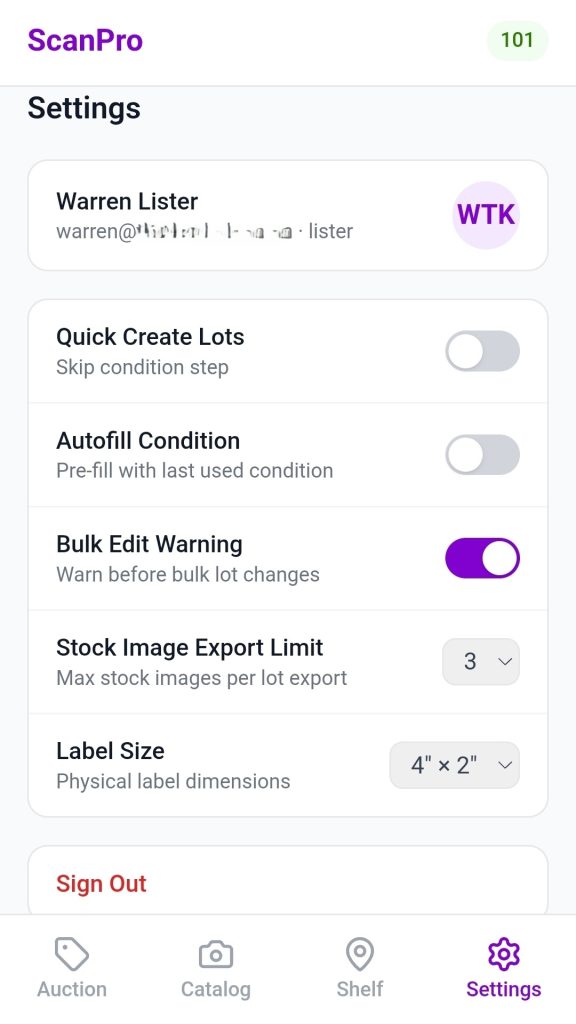
Optional lot fields (your admin controls which ones appear): Quantity, Consignor, Starting Bid, Location ID, Pallet, Min/Max Retail

Tap Next: Condition to continue and rate the item’s condition, damage flags, and star rating.

  • Condition details (appear based on what you select):
    • Damaged? → Yes/No → describe the damage
    • Functional? → Yes/No → describe the limitation
    • Missing parts? → Yes/No → describe what’s missing
    • Star rating (1–5)
    • Notes — anything else require mentioning

Tap Next: Photos after the condition screen.

  • Tap the photo area to take a picture with your camera
  • Take multiple angles if needed
  • Tap the pencil icon on any photo to crop, mark, or erase the background

Stock images (from the catalog lookup) are already attached. Take item photos to show actual condition.

Made a mistake? Need to add a photo or fix the condition? Use the Find & Edit feature in the Catalog tab.
  1. From the Catalog tab scanner screen, scroll down and tap Find & Edit Existing Lot
  2. In the search panel:
    • Type a Stock ID (e.g. KJ1234), lot number, or item title — then tap Go
    • Or tap the camera icon to scan the barcode on the label already on the item
  3. Tap the lot from the results to open its detail view
  4. Tap the Edit (pencil) icon in the top-right of the detail sheet
  5. The full form loads with all existing data pre-filled — a purple banner confirms “Editing Lot #X · KJ1234”
  6. Make your changes — update any field, fix condition, or add new photos
    • Existing photos are kept; new photos are appended
  7. Tap Save Changes

Editing is only available while the auction is still active. The Auction tab shows the lot list as read-only — edits are done from the Catalog tab.

Made a mistake? Need to add a photo or fix the condition? Use the Find & Edit feature in the Catalog tab.

  1. Tap the Auction tab at the bottom of the screen
  2. Tap the auction name to open its lot list
  3. Find the lot you want to edit — use the search bar to find by lot number, Stock ID, or title
  4. Tap the lot row to open its detail sheet
  5. Tap the lot from the results to open its detail view
  6. Tap the Edit (pencil) icon in the top-right of the detail sheet
  7. The full form loads with all existing data pre-filled — a purple banner confirms “Editing Lot #X · KJ1234”
  8. Make your changes — update any field, fix condition, or add new photos
    • Existing photos are kept; new photos are appended
  9. Tap Save Changes


Editing is only available while the auction is still active. The Auction tab shows the lot list as read-only — edits are done from the Catalog tab.

After adding photos, tap Next: Scan Label →.

The screen shows a summary of your lot — title, condition, auction number, and photo count — so you can confirm you’re saving the right item before you commit.

The physical label on the item has a Lot or Stock Number printed on it.

  1. Tap Scan Lot/Stock Number Label and point the camera at the barcode on the label
  2. Or type the number manually and tap Go
  3. The app confirms the lot number is valid and not already used in this auction or the stock number is registered and available
  4. A green checkmark appears with the confirmation
  5. Tap Save Lot #327 or Stock #AS1229 — the lot is saved and a unique stock ID is assigned automatically in the background

Errors:

  • “not a valid Stock ID”→ Wrong format
  • “Label not found — make sure you’re scanning a ScanPro label”→ Not in label pool
  • “Label already assigned to another lot — contact your admin”→ Already used


Re-scan link appears if wrong label was scanned

Manual fallback — if camera won’t cooperate, type the 6-character Stock ID (e.g. KJ1234) and tap Go

✅ KJ1234 confirmed = Save Lot, the Stock ID becomes the lot’s unique_item_id and is marked used in the label pool

Edit mode skips the label step entirely — goes straight to “Save Changes” from the photos step since the lot already has its Stock ID.

If you type exactly READ DESCRIPTION into the Image Tag field, then when the admin exports the HiBid Photo ZIP, the app automatically draws a white banner with bold red “READ DESCRIPTION” text across the top of every photo for that lot. This signals to HiBid bidders to read the lot description before bidding (used for lots with damage, missing parts, caveats, etc.).

General use

Any other value you type is just stored on the lot as metadata. The placeholder says e.g. IMG-001 — it’s there if you want to cross-reference photos with an external system or give a photo batch a reference code. Currently nothing else in the app reads or acts on it beyond the READ DESCRIPTION check.

Where it appears

  • Lister enters it on the Photos step during cataloging
  • It’s included when editing an existing lot
  • It’s part of the HiBid photo export logic in hibidPhotoExport.ts

The tabs

Tap Auction to see all lots in your active auction. Use the search bar to find a lot by lot number, Stock ID, or title. Tap any lot to see its full details and photos.

This is a view-only list. To make changes, use Find & Edit from the Catalog tab.

Use Shelf mode when placing cataloged items on a shelf or pallet.

  1. Tap Shelf tab
  2. Scan or type the shelf/pallet ID (e.g. “A3” or “PALLET-7”)
  3. Scan each item’s label as you place it — the app logs the location
  4. Tap Done when the shelf is full

Tap Settings to personalize your experience:

  • Quick Create — skip straight to photos (skips condition form, faster for experienced listers)
  • Auto-fill Condition — repeats your last condition entry for the next item
  • Label Size — match what your admin pre-prints (2×2 or 4×2)

Quick Reference

What you want to doWhere to go
Start a new lotCatalog tab → Scan or Search
Fix a lot you already savedCatalog tab → Find & Edit Existing Lot
Browse lots in your auctionAuction tab
Assign a shelf locationShelf tab
Change your settingsSettings tab
Switch auctionAuction tab → tap a different auction

ScanPro by pkgPlace

Admin tutorial

Your Role as Admin

As an admin you control everything the listers work within. You create auctions, manage lots, handle consignors, print labels, export to HiBid, and monitor your team’s performance.

Listers can only see and act on what you’ve set up.

The Admin Dashboard

When you log in you land on the Admin Dashboard. The top navigation gives you access to:

  • Auctions — your main workspace
  • Items — the global product catalog
  • Team — staff, consignors, settings, and performance
  • Scan Items — switches you into Lister mode (same app, lister view)
Tap + New Auction from the Auctions tab. Required fields:
  • Title — descriptive name (e.g. “March Electronics Liquidation”)
  • Auction Number — your internal reference shown on labels and exports
  • Date — the auction day
  • Closing Date — when bidding ends (used to lock lister editing)

Optional but recommended:
  • Pickup Start / Pickup End — shown on labels for buyer reference
  • Default Starting Bid — applied to all new lots unless overridden
  • HiBid Link — the URL for this auction on HiBid

Lot Number Mode — this determines what goes on the physical labels:
Mode Labels show Lot # assigned Stock ID assigned
Sequential Lot number Auto (1, 2, 3…) Auto in background
Prefixed Lot number Auto (A-001…) Auto in background
Manual Lot number Lister scans label Auto in background
Stock ID Stock ID (e.g. KJ1234) Auto in background Lister scans label
Choose Stock ID mode if you pre-print labels from the label pool and want items tracked permanently across auctions. Choose a lot number mode if your workflow assigns lot numbers first.

Before listers start cataloging, print a batch of labels to hand out.

  1. Open the auction from the Auctions tab
  2. Tap Print Labels (or access from the label pool section)
  3. Enter the number of labels to generate
  4. The app creates that many unique Stock IDs in the label pool with status available
  5. Print the sheet — each label shows a QR code, Stock ID, and auction info
  6. Hand labels to listers before they begin — one label per physical item
Tap any auction to expand it and see its lot list. The lot table shows:
  • Thumbnail, Lot #, Stock ID, Title, Brand, Condition, Consignor, MSRP, Location, Status

Search and filter:
  • Use the search bar to find by title, brand, Stock ID, or lot number
  • Filter pills: All / Active / Passed / Sold
  • Sort by any column header

Actions on individual lots:
  • Tap a row to expand lot details
  • Edit any field inline
  • Mark as Passed if the item didn’t sell
  • Delete if entered in error

Bulk actions:
  • Check the box on multiple lots to select them
  • Bulk edit — update condition, consignor, starting bid, or location across all selected lots at once
  • Move passed lots — select passed lots and move them to another active auction; they are assigned the next available lot numbers automatically and their Stock ID stays the same
  1. Find the auction in the Auctions tab
  2. Tap ⬇ HiBid Export
  3. In the modal, confirm your export settings (title prefix, condition, Stock ID in description)
  4. Tap CSV — downloads HiBid-Auction-{number}-{date}.csv
  5. Tap Photos ZIP — downloads all lot photos as a ZIP; a progress bar shows while photos are bundled (any CORS-blocked photos will be skipped with a warning)
  6. Upload the CSV file to HiBid to import your lots
  7. Upload the photos ZIP to HiBid to attach images to the lots
If your supplier provides a manifest (CSV or Excel), you can import it to pre-populate lots.
  1. Go to the auction and tap Import Items
  2. Upload your file — CSV or .xlsx accepted
  3. The app displays your file’s column headers and maps them to ScanPro fields automatically
  4. Review the mapping — adjust any columns that weren’t detected correctly
  5. Common headers are recognized automatically: Title, Description, UPC, ASIN, Retail Price, Quantity, Condition, Consignor, Location, Pallet, and more
  6. Tap Import to create the lots

Imported lots are created as drafts. When a lister scans an item from the manifest, the draft lot is matched and promoted to active — no duplicate lot is created.

Consignors are individuals or businesses that bring items to you to sell on their behalf.

Access: Team tab → Consignors

Managing consignors:

  • Tap + Add Consignor to create a record (name, contact, phone, email, commission %)
  • Edit or delete from the consignor list
  • Consignor names appear as an autocomplete option in the lister’s lot form


Consignor report:

  • Tap any consignor → Report tab
  • Shows all lots attributed to that consignor across auctions — title, lot number, condition, status, starting bid
  • Printable directly from the browser

The Team tab has four sections:

Team Members
  • View all lister accounts
  • See initials, full name, and role
  • Add or remove team members (user management)
Consignors
  • Same as Section 6 above, accessible here as well
Settings
  • Label Size — 2×2 or 4×2 (applies to label printing)
  • Stock Photos per Lot — how many stock images are saved per lot (0–5)
  • Lot Field Visibility — toggle which optional fields appear in the lister’s form: Quantity, Consignor, Starting Bid, Location, Pallet, HiBid Link, Retail High/Low, Image Tag, Title, Description
  • HiBid Export Settings — the same settings available on each auction, set as defaults here
Performance
  • Active Now — shows which listers are currently cataloging
  • Per-lister stats — lots cataloged, items scanned, photos taken
  • Filter pills — view by time period or individual lister
  • Team totals — aggregate numbers across the whole team

The Items tab is the pkgPlace product catalog — independent of any specific auction.

  • Every item ever scanned or imported exists here
  • Search by title, UPC, ASIN, or brand
  • Edit an item’s title, description, brand, category, or retail price
  • Changes here update the item globally — all lots linked to this item reflect the change
  • Stock images are stored at the item level and shared across all lots for that product
Tap Scan Items in the top navigation to switch into the lister view.
This is useful for:
  • Testing the lister workflow
  • Filling in for a lister who is absent
  • Demonstrating the app to a new team member

Tap ← Admin in the top-left of the lister view to return to the Admin Dashboard.

When an admin imports a manifest, ScanPro creates draft lots — placeholder lots pre-populated with the manifest data (title, description, UPC, quantity, consignor, etc.). These drafts sit quietly in the background until a lister physically scans the matching item.

Draft lots that are never scanned by a lister remain as drafts indefinitely. You can see and manage them in the lot list — filter by status to find unmatched drafts before closing an auction.

Paste any product URL (Walmart, Best Buy, Canadian Tire, etc.) and hit Enter or Go.

URLs get title only — no images or price, since there’s no structured API for them.

The following companies are in the Quickscan

  • Walmart
  • Bestbuy
  • Amazon
  • Target
  • Costco
  • Home Depot
  • Canadian Tire
  • Staples
  • The Source
  • ebay
  • Etsy
  • Wayfair
The following companies are in the Quickscan
  • ca
  • com
  • co\.uk
  • com\.au

Quick Reference

TaskWhere
Create an auctionAuctions tab → + New Auction
Print a label batchOpen auction → Print Labels
Import a manifestOpen auction → Import Items
Export to HiBidOpen auction → ⬇ HiBid Export
Edit a lotOpen auction → tap lot row
Move passed lotsOpen auction → select lots → Move to auction
Manage consignorsTeam → Consignors
View team performanceTeam → Performance
Edit global item dataItems tab → search → edit
Switch to lister modeTop nav → Scan Items
Adjust label settingsTeam → Settings

Warehouse & Delivery

post-auction tutorial

Setting up your auction

Before your get started, update your winning bid notification and customer invoices, Create a ‘Delivery’ lot, add images to your lot and create a website banner, and update your Terms and Conditions. The following will help you set up your business to notify your customers of the pkgPlace partnership.

Step 1 - Update your winning bid notification AND invoice

NEW – pkgPlace helps your customers schedule a time to pick up of their items from your facility and NOW ours. And of course, we still deliver to the customer’s door.

If you do not want to use our free scheduler for customers to schedule a pick up at your warehouse, then use the following information in the winning bid notification email that is sent to your customers.

To request a delivery or to pick up your items at a pkgPlace pick up depot, visit https://app.pkgplace.com/customer

Don’t forget to include it in the bottom of your invoice.

If you wish to use our complimentary scheduler to organize pick ups from your warehouse with the pkgPlace delivery and depot services then add the following to your winning bid notification email. Make sure you edit it to add your auction in the link.

To schedule a pickup at our warehouse or request a delivery from pkgPlace (which includes using the pkgPlace pickup depot), visit https://app.pkgplace.com/ah/<enter your action name as it is in pkgPlace>.

Step 2 - Create a 'Delivery' Lot

Lead
Delivery or pick up depot with pkgPlace.

Description
Request a pick up at a pkgPlace depot or enjoy delivery to your door with www.pkgplace.com.

  • Payment is made directly to pkgPlace AFTER the items are picked up.
  • More information can be found at www.pkgplace.com.
  • <insert auction house> is not responsible for items once they have left our warehouse.


Add the images below to improve your lots.

Step 3- add a Website Banner

Include this banner on your website and hyperlink to www.pkgplace.com to make life easier for your customers.

Step 4 - update your Terms and Conditions

It is the responsibility of the bidder to sign up for delivery with pkgPlace directly and to understand their terms and conditions prior to requesting the delivery.
We don’t release the items for delivery until the items have been paid for in full.
We are not responsible for any items after it is released from the warehouse to pkgPlace.
Payment is made directly to pkgPlace.

Here you will be able to get yourself logged into AuctionPro Warehouse software.

Turtorial

This section will guide you through the steps to add an auction to the pkgPlace auction view. Used properly, the pkgPlace app will help the warehouse run smoother and without the need for paper.

Upload completed auction from HiBid

Download the Auction from HiBid

  • Visit HiBid and on the main page, select ‘Lot Status‘, which is found in the center button on the bottom toolbar.
  • Now select ‘Export‘.
  • Your report will open in an .XLS (Excel spreadsheet)
  • Save the report in a location (ie. desktop) where you will be able to quickly access it for the next steps.

Upload the Auction to pkgPlace

  • Open up https://app.pkgplace.com/auction-house
  • Enter your username and password if required
  • Click on the ‘Auction‘ tab on the left column
  • Click on the green ‘UPLOAD INVOICES‘ button and a popup will open
  • With the popup open, enter the auction title (or just the number), the auction close date, and the file created in Step 1 above
  • Only after the file has been selected, click on the blue ‘UPLOAD‘ button
  • A new row should be created with the information
  • Click anywhere on the row to verify if the data looks good and all columns are populated.

Congratulations!! Your items and invoices are cataloged.

managing your auction

Use the labels for Shelves, Bins, Pallets, and any other area where you keep items. Our shelf management is fully integrated into the cataloging app.

Simply scan the shelf and the items as you put them onto the shelf and this information follows the item until it is pulled off the shelf. Our labels are scannable with QR codes and the big clear labels make it easy to identify the shelf.

Tutorial

Some auction houses catalog the Lots to make them easier to find when picking invoices. To catalogs items after the auction close date, is to keep your items organized for everyone until delivered to the customer.

Tutorial

preparing items for delivery